Posted on Apr 2nd 2014 by trekprops.de.
If you want to make more than one unit of any given prop replica, it is inevitable to make molds of all the parts you need. This way you’ll be able to make multiple resin casts of each piece. For the Neutrino Probe, this presented a few unique challenges I had to tackle along the way due to the special nature of the body, its prototype parts and the fact that I wanted to put electronics in there. In this blog post I’ll show you exactly what I thought would work, what did’t work and – most importantly – what I ended up doing. [More…]
Posted on Aug 8th 2013 by trekprops.de.
Following my recent “show-off” post presenting my Voyager Desktop Computer, let’s now have a detailed look at how I built this prop, going through every step, from the raw parts all the way to the finished unit, covering the concepts of different aspects of the prop, the construction of several custom parts, the installation of the electronics and the assembly of everything to bring it all together. Although I didn’t snap an image of every step along the way, it’s more than a hundred progress pictures, so I hope you brought a little time… [More…]
Posted on Nov 19th 2010 by trekprops.de.
 Well, well, well, what do we have here? Might that be a long overdue update on the Neutrino Probe project? “No, that’s impossible!”, you might think. After all, the last update was almost exactly one year ago! How could this still be a go? Well, you better believe it ’cause this baby is alive and kickin’! Still not positive? Jump past the break to look for yourself. Have you ever been told that you’re hard to convince of something? [More…]
Posted on Feb 17th 2006 by trekprops.de.
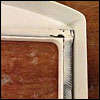
 When I got my mobile holo-emitter in an exchange deal, there were some things I didn’t like about it: First off, the curcuit graphic which had been made from a gold foil with the pattern printed green on it was not cut out accurately thus being too small for the intended place. This was especially distracting in the upper right corner of the indentation where the gap was really quite big. Second, the surface of the prop wasn’t really worked up to the degree of a smooth finish I would have liked to have. [More…]
Posted on Dec 23rd 2005 by trekprops.de.
Styrene is the typical material to build models because it is very easy to handle. It is a kind of plastic which is available in different thicknesses (0,3 to 5 mm), colors (even with effects like “mirror”) and shapes, for example sheets, pipes, profiles, structured sheets (i.e. ribbed) and many more. [More…]
Posted on Oct 30th 2005 by trekprops.de.
 Welcome to the online assembly instructions for my ODN scanner hero kit. In this tutorial, you’ll see how to prepare the electronics for installation and how to insert them into the body. You’ll also learn how to prepare and assemble the hollow resin shells to build up a fully functional hero ODN scanner. First, here’s a pic of the entire kit: 2 resin body parts, electronics, acrylic rod, display graphics, styrene (1.0 mm and 1.5 mm), 2 screws, templates for the styrene details. That’s all you need, so let’s begin! [More…]
Posted on Oct 29th 2005 by trekprops.de.
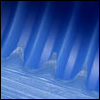
 In this second installment of my ODN Scanner progress report I will describe how the finished master model (see Part I) is used to fabricate a silicone rubber mold which then can be used to cast resin kit parts.
Because the finished prop was supposed to contain an electric circuit with a super bright red LED and five green sequencing lights, the mold had to be done in a way so that the [More…]
Posted on Oct 28th 2005 by trekprops.de.
 Welcome to the first part of my progress report covering the creation of my ODN Scanner! In this part I will show you how I scratchbuilt the prototype (the so-called master model) of this prop that I will later cast in resin. Part II and the Tutorial will then cover how I did the silicone rubber mold and how to build up one of the resulting kits. [More…]
Posted on Oct 24th 2005 by trekprops.de.
 Chief engineers using their wonderful high tech instruments to diagnose, calibrate and repair circuits and talking “technobabble” – that’s what I love about Star Trek! Geordi LaForge, Miles O’Brien and B’Elanna Torres are some of my favourite characters because they know every system and every technical detail on their ship inside and out – from waste disposal to the warp core. [More…]
Posted on Apr 24th 2005 by trekprops.de.
 The Type I phaser from TNG, a prop barely 9 centimetres long. To do a replica of this can’t be much trouble, right? Wrong! The smaller the object is, the finer are the details and the more time has to be spent to make the prop look good. I will describe here what I did to build this “cricket” phaser up. When I got the kit from a member of the ASAP board , it was in a pretty raw shape, which is not uncommon for resin castings however. This meant that the surface had to be smoothed out (especially [More…]
